目录
- 1 Testing介绍::Unit Test
- 2 Python的 Unit Test:测试Wikipedia
- 3 Test with Selenium:测试网页互动
- 4 如何选择:Unit Test还是Selenium
- 5 总结
- 6 参考资料
当你在面对有一大”栈”的网络项目的时候,通常都是那些后台的”栈”有被测试。大部分编程语言(包括Python)都有测试库,但是网络前段的测试通常被忽略,虽然事实是前段才是和用户直接接触的部分。
导致这种情况的一个问题是网页是有多种标记语言和编程语言混合写成的,这导致测试难度增加。
解决的办法有两个。
-
low-level的test。码农们通常用一个简单的清单和bug tracker来人工test。
-
Web Scraper结合unit test。
在这篇笔记中,我们会介绍test的基础和如何用基于Python的Web Scraper test各种网站,从简单到复杂。
1 Testing介绍::Unit Test
如果你还没有写过测试程序,那么没有比现在更好的时候了。用一套测试系统来测试你的代码如预期运行可以节省你很多时间和忧虑。
我们先来介绍下什么是Unit Test。
Unit Test:a software development process in which the smallest testable parts of an application, called units, are individually and independently scrutinized for proper operation。
一个Unit Test通常有以下几种特征。
-
每一个Unit Test只负责测试一个功能。这是Unit的含义。
-
每一个Unit Test可以单独运行。任何test前的设置和test后的设置都属于Unit Test的一部分。
-
每一个Unit Test经常只包括1个Assertion。
-
每一个Unit Test都从主程序分别开来存储。
下图是一个简单的Unit Test。
1
2
3
4
5
6
7
8
9
10
11
12
13
14
15
16
17
18
19
20
21
22
23
24
25
import unittest
class TestAddition(unittest.TestCase):
def setUp(self):
print("Setting up the test")
def tearDown(self):
print("Tearing down the test")
def test_twoPlusTwo(self):
total = 2+2
self.assertEqual(4,total)
def test_onePlusTwo(self):
total = 1+2
self.assertEqual(3,total)
if __name__ == '__main__':
unittest.main()
# Output
# Testing started at 下午5:34 ...
# Setting up the test
# Tearing down the test
# Setting up the test
# Tearing down the test
TestAddition继承自unittest.TestCas类。
Python的Unit Test模块,unittest是一个系统内建的模块。你可以import unittest.TestCase,它会执行如下功能:
-
提供
setUp(unit test运行前)和tearDown(unit test运行后)功能在每一个 unit test里。 -
提供若干种
assert语句来允许测试通过或通不过。 -
运行任何以
test_开头的函数,忽略其他函数。
2 Python的 Unit Test:测试Wikipedia
测试网站的(不包括JavaScript的)前端非常简单,只需要结合Web Scraper和unittest库即可。
1
2
3
4
5
6
7
8
9
10
11
12
13
14
15
16
17
18
19
20
21
22
23
24
25
26
27
from urllib.request import urlopen
from bs4 import BeautifulSoup
import unittest
class TestWikipedia(unittest.TestCase):
bsObj = None
def setUpClass():
global bsObj
url = "http://en.wikipedia.org/wiki/Monty_Python"
bsObj = BeautifulSoup(urlopen(url).read(),"html.parser")
def test_titleTest(self):
global bsObj
pageTitle = bsObj.find("h1").get_text()
self.assertEqual("Monty Python",pageTitle)
def test_contentExists(self):
global bsObj
content = bsObj.find("div",{"id":"mw-content-text"})
self.assertIsNotNone(content)
if __name__ == '__main__':
unittest.main()
# Output
# Testing started at 下午5:27 ...
这里需要注意的是setUpClass()和setUp()的区别,前者在所有test_函数运行前只运行一次,而后者在每一次test_函数运行前都运行一次(具体见之前的例子)。
一次只测试一个网页看起来不是那么有趣,我们来看看如何一次测试多个网站。
1
2
3
4
5
6
7
8
9
10
11
12
13
14
15
16
17
18
19
20
21
22
23
24
25
26
27
28
29
30
31
32
33
34
35
36
37
38
39
40
41
42
43
44
45
46
47
48
49
50
51
52
from urllib.request import urlopen
from urllib.parse import unquote
import random
import re
from bs4 import BeautifulSoup
import unittest
class TestWikipedia(unittest.TestCase):
bsObj = None
url = None
def test_PageProperties(self):
global bsObj
global url
url = "http://en.wikipedia.org/wiki/Monty_Python"
# Test the first 100 pages we encounter
for i in range(1, 100):
bsObj = BeautifulSoup(urlopen(url))
titles = self.titleMatchesURL()
self.assertEquals(titles[0], titles[1])
self.assertTrue(self.contentExists())
url = self.getNextLink()
print("Done!")
def titleMatchesURL(self):
global bsObj
global url
pageTitle = bsObj.find("h1").get_text()
urlTitle = url[(url.index("/wiki/") + 6):]
urlTitle = urlTitle.replace("_", " ")
urlTitle = unquote(urlTitle)
return [pageTitle.lower(), urlTitle.lower()]
def contentExists(self):
global bsObj
content = bsObj.find("div", {"id": "mw-content-text"})
if content is not None:
return True
return False
def getNextLink(self):
global bsObj
links = bsObj.find("div", {"id": "bodyContent"}).findAll("a", href=re.compile("^(/wiki/)((?!:).)*$"))
link = links[random.randint(0, len(links) - 1)].attrs['href']
print("Next link is: " + link)
return "http://en.wikipedia.org" + link
if __name__ == '__main__':
unittest.main()
是不是很简单呢。
3 Test with Selenium:测试网页互动
如果测试JavaScript在内的网站,可以用Selenium。而事实上,Selenium当初就是一个为网页测试而启动的项目。Selenium的unit test和unittest的Unit Test的设置不大一样。前者只需要assert就可,如下代码。
1
2
3
4
5
6
from selenium import webdriver
driver = webdriver.PhantomJS(executable_path='/Applications/phantomjs-2.1.1-macosx 2/bin/phantomJS')
driver.get("http://en.wikipedia.org/wiki/Monty_Python")
assert "Monty Python" in driver.title
driver.close()
3.1 Interacting with the Site
WebElement类有一系列方法可以与网页互动,例如click(),click_and_hold(),release(),double_click()。
我们用这个网页来尝试下面代码。
1
2
3
4
5
6
7
8
9
10
11
12
13
14
15
16
17
18
19
20
21
22
23
24
from selenium import webdriver
from selenium.webdriver.remote.webelement import WebElement
from selenium.webdriver.common.keys import Keys
from selenium.webdriver import ActionChains
driver = webdriver.PhantomJS(executable_path='/Applications/phantomjs-2.1.1-macosx 2/bin/phantomJS')
driver.get("http://pythonscraping.com/pages/files/form.html")
firstname = driver.find_element_by_name("firstname")
lastname = driver.find_element_by_name("lastname")
button = driver.find_element_by_id("submit")
# method1
firstname.send_keys("John")
lastname.send_keys("snow")
button.click()
print(driver.page_source)
# method2
actionChains = ActionChains(driver)
actionChains.click(firstname).send_keys("John").click(lastname).send_keys("snow").send_keys(Keys.RETURN)
actionChains.perform()
print(driver.page_source)
第一个方法是分别在各个field里输入名字,然后在submit里点击。第二个方法是连成动作链,输入名字,然后回车,最后perform()。
3.2 Drag and Drop
Selenium还可以用于HTML5的Drag和Drop操作。
我们用这个网页来尝试下面代码。
1
2
3
4
5
6
7
8
9
10
11
12
13
14
15
16
17
from selenium import webdriver
from selenium.webdriver.remote.webelement import WebElement
from selenium.webdriver import ActionChains
driver = webdriver.Chrome(executable_path='/Applications/chromedriver')
driver.get('http://pythonscraping.com/pages/javascript/draggableDemo.html')
print(driver.find_element_by_id("message").text)
element = driver.find_element_by_id("draggable")
target = driver.find_element_by_id("div2")
actions = ActionChains(driver)
actions.drag_and_drop(element, target).perform()
print(driver.find_element_by_id("message").text)
#seems not work?
3.3 Taking Screenshots
Selenium还有一个令人印象深刻的有趣功能,就是提供截图。请看下面代码。
1
2
3
4
5
6
from selenium import webdriver
driver = webdriver.PhantomJS(executable_path='/Applications/phantomjs-2.1.1-macosx 2/bin/phantomJS')
driver.get("http://en.wikipedia.org/wiki/Monty_Python")
assert "Monty Python" in driver.title
driver.close()
4 如何选择:Unit Test还是Selenium
Python的unittest稍显啰嗦但是可以应用在大型项目中。而Selenium却是JavaScript网站的唯一选择。因此何时用unittest何时用Selenium呢?其中答案很简单,两者并不矛盾,可以一起用,请看下面代码。
1
2
3
4
5
6
7
8
9
10
11
12
13
14
15
16
17
18
19
20
21
22
23
24
25
26
from selenium import webdriver
from selenium.webdriver.remote.webelement import WebElement
from selenium.webdriver import ActionChains import unittest
class TestAddition(unittest.TestCase):
driver = None
def setUp(self):
global driver
driver = webdriver.PhantomJS(executable_path='<Path to Phantom JS>')
url = 'http://pythonscraping.com/pages/javascript/draggableDemo.html'
driver.get(url)
def tearDown(self):
print("Tearing down the test")
def test_drag(self):
global driver
element = driver.find_element_by_id("draggable")
target = driver.find_element_by_id("div2")
actions = ActionChains(driver)
actions.drag_and_drop(element, target).perform()
self.assertEqual("You are definitely not a bot!", driver.find_element_by_id("message").text)
if __name__ == '__main__':
unittest.main()
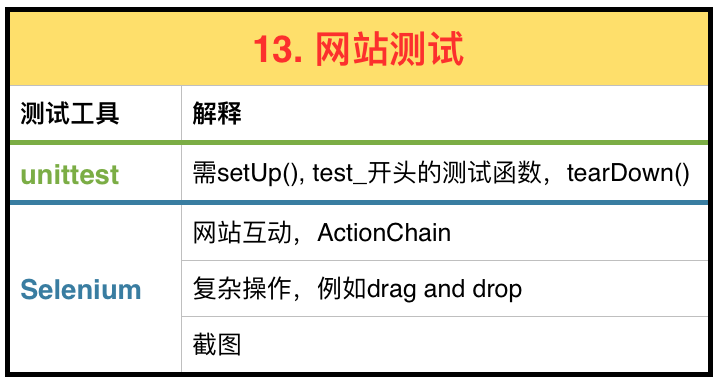
5 总结
本文我们介绍了Unit Test的两个工具:
-
Python的unittest库。设置稍显啰嗦,需要实现
setUp(),tearDown(),test_,再结合assertEqual()。 -
Selenium。可以和网站互动,drag and drop,以及截图等。
两者并不冲突,因此可以结合起来使用。
最后将本文总结成下图以供参考。
